If you are trying to get an understanding of Microcontroller Arduino. The first program you will start from glowing an LED. Thereafter, you will use Ultrasonic sensor, DHT sensor, Touch sensor etc. Furthermore, you should have experience of C/C++.
Moreover, if you see the code, there are two functions setup() and loop().
If you put your code inside setup() function it will run only once, and If you put inside loop() function it will run forever.
Basically, statements related to configuration of pins, and data rate are put inside setup() function.
Code related to actions which repeat will be inside loop() function.
void setup()
{
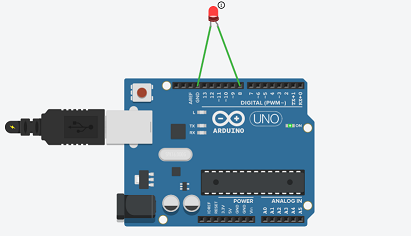
pinMode(13, OUTPUT);
}
void loop()
{
digitalWrite(13,HIGH);
delay(1000);
digitalWrite(13,LOW);
delay(1000)
}
[/dm_code_snippet]
If you see the above code, inside setup() function, pinMode(13, OUTPUT); statement, which configures that pin 13 will be used for output function.
Inside loop() statement, digitalWrite(13,HIGH); will make pin no. 13 voltage high and LED will glow.
Inside loop() statement, delay(1000); is used for glowing L. E. D. for 1000 milliseconds.
Inside loop() statement, digitalWrite(13,LOW); will make pin no. 13 voltage low and LED will not glow.
And above four actions will repeat until you close the program.
See all explanation in the video.